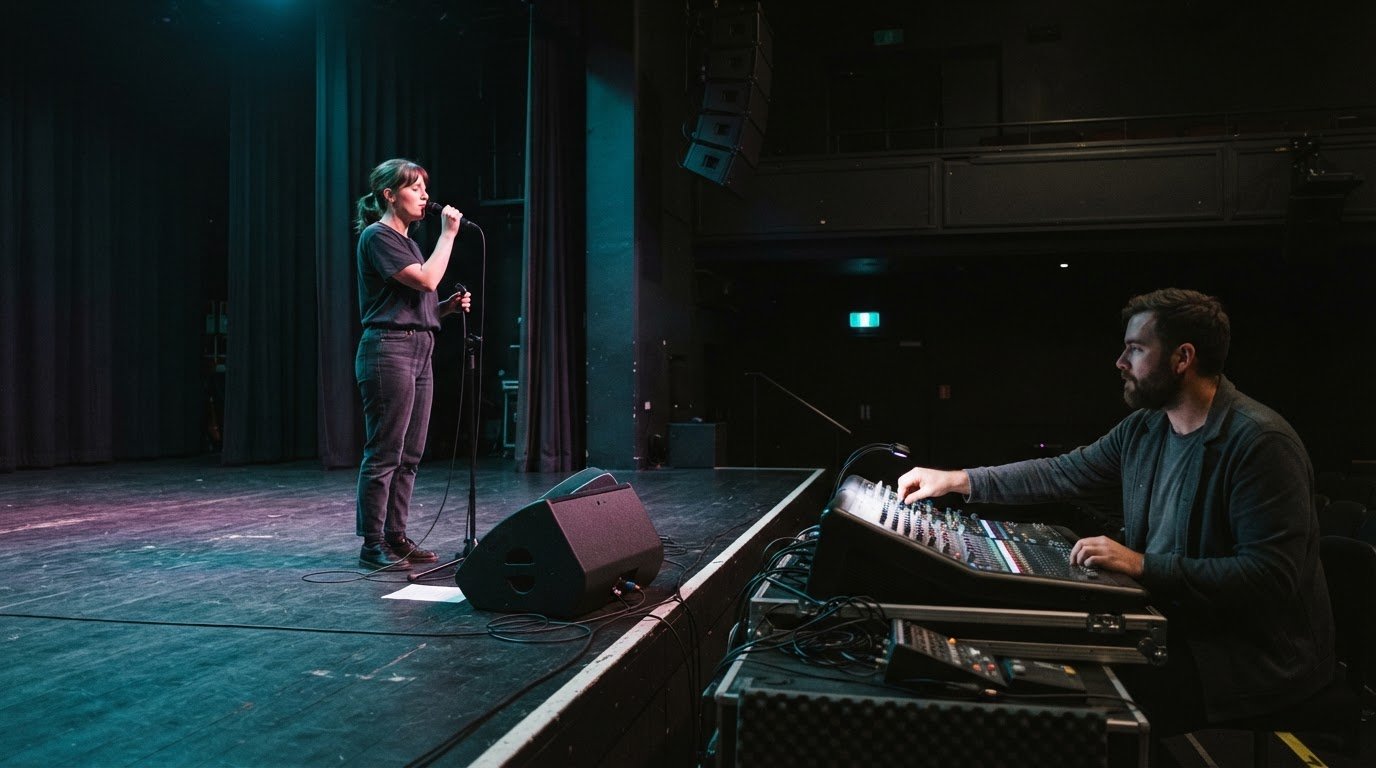
How to Prevent Microphone Feedback on Stage with EQ

The quickest way to reduce stage microphone feedback is usually to reposition the microphone, PA speakers or monitors before reaching for EQ. Feedback starts when a microphone picks up sound from a speaker connected to the same system. To understand how to prevent microphone feedback on stage, keep microphones out of the speakers’ direct sound, then use EQ to reduce any frequencies that still ring.

If you reach for EQ whenever a howl or whistle breaks through, that instinct is understandable. But EQ works best after you’ve settled the stage layout. Small changes to microphone placement, speaker direction and monitor position can give the system more room to operate.

This guide explains what causes feedback and how to reduce it through practical placement, careful EQ and a microphone suited to the performer and stage volume. You’ll also learn how monitor wedges and microphone pickup patterns affect the result, helping you create clearer, more controlled sound for the audience.

Key Takeaways

  • Start by positioning microphones and loudspeakers to limit how much speaker output reaches each microphone.
  • Identify the ringing frequency and make a focused EQ cut rather than making broad changes to the sound.
  • Keep choir microphones clear of monitor wedges, and position wedges to suit each microphone’s pickup pattern.
  • Match the singer’s microphone to their technique and stage volume for clearer sound and more usable gain.

1. What Causes Feedback in a Sound System?

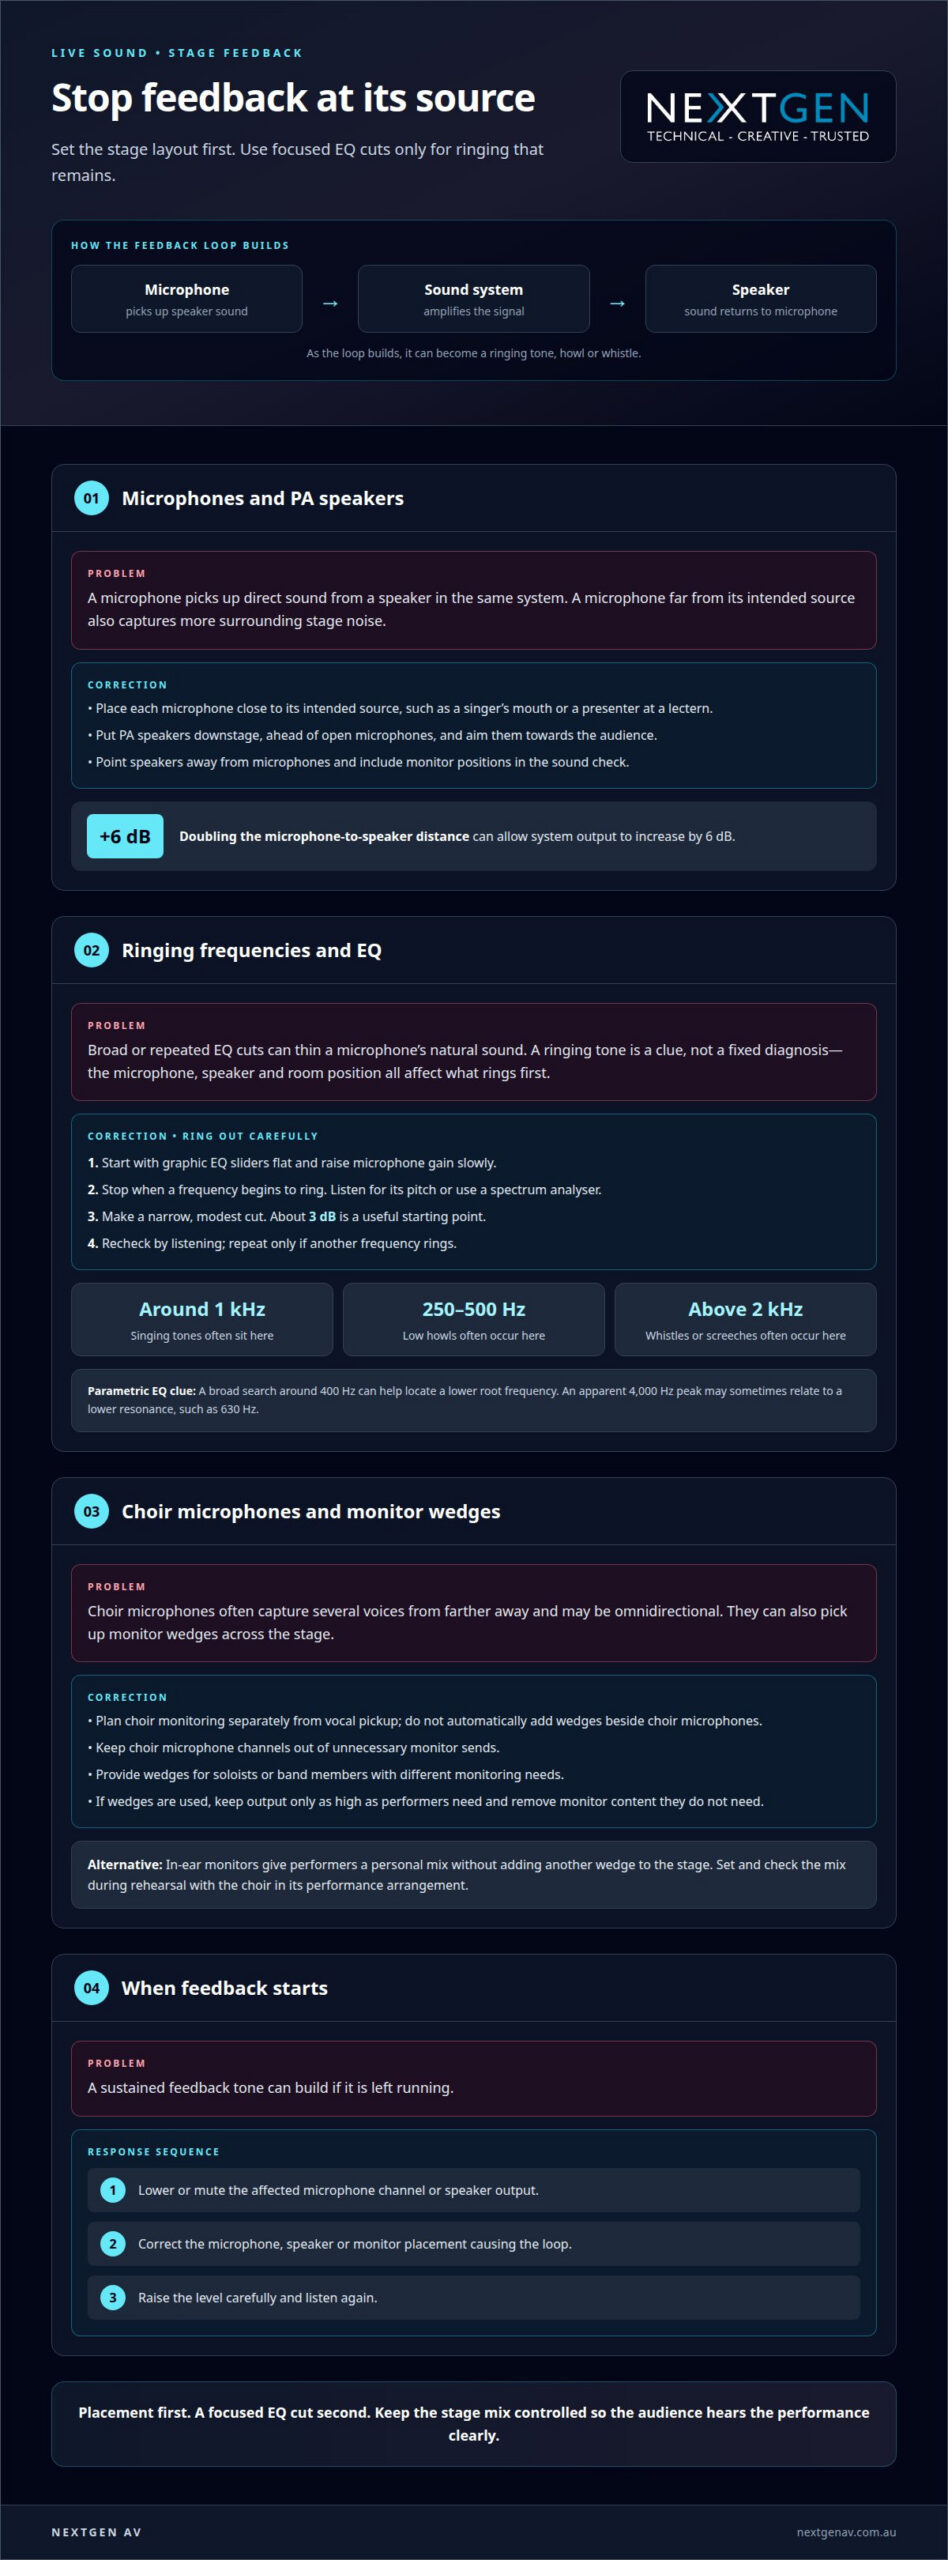
Feedback starts when a microphone picks up sound from a speaker connected to it, sending the signal through the same system again. As the loop builds, you hear a ringing tone, howl or whistle. A stage monitor can create the same cycle when its sound reaches a microphone connected to that monitor mix. Feedback comes from the sound path, not simply from an EQ setting.

Place each microphone close to its intended source, such as a singer’s mouth or a presenter at a lectern. A stronger wanted signal gives the engineer more control over nearby instruments and amplifiers. A microphone far from its source captures less of the intended sound relative to surrounding stage noise, making clear amplification harder to achieve.

For the PA, place speakers downstage, ahead of open microphones, and aim them towards the audience rather than across the stage. Increasing the microphone-to-speaker distance can help: doubling that distance can allow system output to increase by 6 dB. Pointing speakers away from microphones also reduces how much amplified sound returns to them. Stage monitors can still cause feedback, so include their position in the sound check.

Microphone direction matters, too. A directional microphone responds differently to sound arriving from the front, sides and rear. Keep its intended pickup area facing the performer or source, and avoid positioning it where it receives direct PA output. Make physical placement changes before using EQ to tackle a ringing frequency.

Australian venue and workplace noise requirements for live stage sound depend on the event space and worksite. Plan speaker output to suit the conditions that apply to the venue and event.

Can feedback damage hearing or speakers, and what should you do if it starts? Don’t leave a sustained feedback tone running. Lower or mute the affected microphone channel or speaker output, correct the placement causing the loop, then raise the level carefully.

2. Identifying and reducing feedback frequencies with EQ

Feedback has a tonal signature, but the sound alone doesn’t identify its cause. Singing tones often sit around 1 kHz, low howls around 250–500 Hz, and whistles or screeches above 2 kHz. Treat these as clues, not fixed rules: microphone, speaker and room placement affect which frequencies ring first.

To ring out a system, begin with the graphic EQ sliders flat and raise the microphone gain slowly. Stop as soon as a frequency begins to ring; don’t let feedback build into a sustained howl. Listen for the pitch or use a spectrum analyser, then make a narrow, modest cut. A cut of about 3 dB is a useful starting point. Recheck the result and repeat only if another frequency rings.

On a console with parametric EQ, sweep the frequency control slowly while listening for the ring to diminish. A broad starting search around 400 Hz can help locate a lower root frequency; an apparent 4,000 Hz peak may sometimes relate to a lower resonance, such as 630 Hz. Avoid cutting every suspected frequency, since excessive EQ can thin the microphone’s natural sound and reduce clarity.

Room modes can reinforce particular frequencies, especially when room dimensions align with bass wavelengths. For example, a 16-foot room dimension corresponds to a mode near 35.3125 Hz; a 16-foot-cubed room can build energy around 35 Hz and its octaves, 70 and 140 Hz. These resonances differ from the higher-pitched ringing often associated with feedback, so assess the room as well as the microphone pattern.

Keep gain before feedback in view: EQ should control the specific ring, not compensate for poor placement or excessive output. A focused cut, followed by a careful listening check, preserves more of the desired tone than broad reductions. For a live event, professional audio system planning can bring microphone, console and room response into one coordinated approach.

3. Avoiding monitor wedges for choir microphones

Choir microphones serve a different purpose from solo vocal microphones: they capture several voices together, often from farther away. Group microphones are frequently omnidirectional, picking up sound across the stage, including monitor wedges. In a church or concert hall, plan the choir’s monitoring needs separately from vocal pickup instead of automatically adding wedges beside the choir microphones.

Build the monitor mix around what each performer needs to hear. A choir may need a reference vocal, accompaniment or conductor cues, while nearby musicians may need a more detailed mix. Keep choir microphone channels out of unnecessary monitor sends, and provide wedges for soloists or band members with different monitoring needs.

In-ear monitors are another option for performers who need a personal mix. They let singers hear their own parts and accompaniment without adding another wedge to the stage. Set the mix carefully during rehearsal, with the choir in its performance arrangement, so the balance reflects what singers need to follow the music.

If wedges remain in use, keep their output only as high as performers need. A well-balanced stage mix helps performers hear their cues without filling the stage with excess sound. If ringing begins, lower the relevant monitor send or microphone channel, then listen again before adjusting other parts of the mix.

Thinning a wedge mix also helps control low-mid sound spilling towards the audience. Remove monitor content performers don’t need while preserving essential cues and musical references. This gives the front-of-house mix a cleaner stage sound and makes the choir easier to balance. For choir microphones, the priority is a focused monitor mix, not simply a louder one.
How to Prevent Microphone Feedback on Stage with EQ

4. Choosing microphones for the singer and stage volume

Choose a microphone to suit the singer’s technique, stage volume and position relative to the PA. Cardioid and hypercardioid microphones are common directional choices for live vocals. A cardioid model with high gain before feedback can suit a singer whose microphone technique is inconsistent. On a loud stage, or when a singer performs in front of the PA, a tighter hypercardioid pickup pattern can help reject sound from the sides.

A moving-coil, or dynamic, microphone is a practical live-sound choice when feedback control matters. Its heavier diaphragm assembly has more inertia to overcome than a condenser microphone’s. This is one reason dynamic microphones are recommended for increasing gain before feedback. The right choice still depends on the singer’s voice, handling and position, not microphone type alone.

Check the microphone’s polar pattern before positioning monitors. A cardioid microphone rejects sound at the rear, while a hypercardioid microphone has some rear pickup and rejects sound at the sides. A singer using a hypercardioid mic should avoid pointing its rear pickup towards a loud monitor. Omnidirectional microphones pick up sound from all angles, so they’re generally unsuitable for high-volume vocal stages.

Microphone distance matters, too. Ask the singer to keep the capsule close to their mouth and maintain a consistent position through quiet and loud passages. Directional microphones used very close can produce 10–15 dB more low-frequency output, so the engineer should listen for excess bass while setting the signal. Close, consistent technique helps the vocalist stay clear without turning up the system unnecessarily.

During soundcheck, test the singer’s actual performance position and monitor level. Raise the vocal signal slowly while the musician sings at performance volume, listening for ringing as the PA and monitors operate together. Adjust microphone angle, monitor position or channel EQ before increasing level further. For a coordinated vocal setup, plan professional audio system support around the singer, stage layout and audience mix.

NextGen AV

NextGen AV helps event teams coordinate microphone, monitor and PA choices as part of a stage plan. When feedback risks involve several parts of the production, its Professional Audio Systems support can align sound reinforcement with the room, performers and audience experience. LED Video Walls, Lighting Design and Equipment, and Staging and Rigging can also be planned as part of the wider event environment.

For a Melbourne conference, gala or live performance, this coordinated approach helps manage technical decisions behind the scenes, from stage layout to clear, controlled sound. Share your event brief and performance requirements so the production can be shaped around the space and programme.

Contact NextGen AV to discuss your event’s audio and stage requirements.

Plan for a Clean Soundcheck

A strong event mix is designed around the performance, not just the equipment list. Schedule a soundcheck so singers, musicians and the audio team can work through the actual programme in their stage positions. This gives the engineer a practical reference for changes in performer movement, monitor preferences or room response before the audience arrives. Keep agreed microphone and monitor settings clear as the running order moves from rehearsal to the live event.

Use that preparation to turn soundcheck into a working part of your production plan. A focused discussion about how to prevent microphone feedback on stage can help align the sound team around the performers, the room and the event’s goals. For events where the audio setup needs careful coordination, NextGen AV can support the wider production with Professional Audio Systems and technical direction. Contact NextGen AV for sound support and take the next step towards a clear, confident performance.

Frequently Asked Questions

What Causes Feedback in a Sound System?

A stable pitch that grows as a vocal or monitor level rises points to feedback; handling noise is usually brief and irregular. To isolate the source during soundcheck, ask the performer to pause, then mute microphone channels one at a time. If the tone stops when a channel is muted, that channel is part of the loop. This test narrows the search before further adjustments.

What Is Acoustic Feedback?

Acoustic feedback is a sound-system loop carried through the air, not an unwanted signal caused by faulty wiring. For example, reflective surfaces can return amplified sound towards an open microphone and colour what it picks up. To help diagnose the issue, compare the sound with the microphone muted: a tone that disappears when the channel is muted is linked to its signal path.

What causes microphone feedback on stage?

Stage feedback can involve a vocal microphone, a monitor send, another open microphone or the main PA mix. To understand how to prevent microphone feedback on stage, isolate one variable at a time: pause the performer, mute a channel, then restore it and listen. This helps identify whether the trigger follows a particular microphone, performer position or monitor mix.

How should stage speakers be positioned to prevent microphone feedback?

Assess speaker coverage from the audience area as well as the stage. During soundcheck, have a technician listen across the room while the performer uses the microphone in position. A speaker aimed too broadly may send unnecessary sound towards microphones or reflective surfaces. Adjusting its direction or coverage can improve audience consistency while reducing unwanted sound reaching the stage.

How do you set microphone gain and sound levels to avoid feedback?

Set levels using the performer’s actual delivery, including quieter phrases and louder passages. Keep microphone channel, monitor send and main mix adjustments distinct, so a change for one performer doesn’t unexpectedly raise another part of the system. If the singer moves away from the microphone, address that change in technique before increasing the overall mix to compensate.

How can a sound engineer use EQ to reduce microphone feedback?

Use EQ as a targeted adjustment, not a substitute for diagnosing the signal path. A low-cut filter on a microphone channel can reduce unwanted low-frequency energy when it isn’t needed for the source. After a focused cut, compare the vocal with EQ engaged and bypassed at a similar listening level. This helps confirm that the adjustment addresses the problem without sacrificing useful tone.

The quickest way to reduce stage microphone feedback is usually to reposition the microphone, PA speakers or monitors before reaching for EQ. Feedback starts when a microphone picks up sound from a speaker connected to the same system. To understand how to prevent microphone feedback on stage, keep microphones out of the speakers’ direct sound, then use EQ to reduce any frequencies that still ring.

If you reach for EQ whenever a howl or whistle breaks through, that instinct is understandable. But EQ works best after you’ve settled the stage layout. Small changes to microphone placement, speaker direction and monitor position can give the system more room to operate.

This guide explains what causes feedback and how to reduce it through practical placement, careful EQ and a microphone suited to the performer and stage volume. You’ll also learn how monitor wedges and microphone pickup patterns affect the result, helping you create clearer, more controlled sound for the audience.

Key Takeaways

  • Start by positioning microphones and loudspeakers to limit how much speaker output reaches each microphone.
  • Identify the ringing frequency and make a focused EQ cut rather than making broad changes to the sound.
  • Keep choir microphones clear of monitor wedges, and position wedges to suit each microphone’s pickup pattern.
  • Match the singer’s microphone to their technique and stage volume for clearer sound and more usable gain.

1. What Causes Feedback in a Sound System?

Feedback starts when a microphone picks up sound from a speaker connected to it, sending the signal through the same system again. As the loop builds, you hear a ringing tone, howl or whistle. A stage monitor can create the same cycle when its sound reaches a microphone connected to that monitor mix. Feedback comes from the sound path, not simply from an EQ setting.

Place each microphone close to its intended source, such as a singer’s mouth or a presenter at a lectern. A stronger wanted signal gives the engineer more control over nearby instruments and amplifiers. A microphone far from its source captures less of the intended sound relative to surrounding stage noise, making clear amplification harder to achieve.

For the PA, place speakers downstage, ahead of open microphones, and aim them towards the audience rather than across the stage. Increasing the microphone-to-speaker distance can help: doubling that distance can allow system output to increase by 6 dB. Pointing speakers away from microphones also reduces how much amplified sound returns to them. Stage monitors can still cause feedback, so include their position in the sound check.

Microphone direction matters, too. A directional microphone responds differently to sound arriving from the front, sides and rear. Keep its intended pickup area facing the performer or source, and avoid positioning it where it receives direct PA output. Make physical placement changes before using EQ to tackle a ringing frequency.

Australian venue and workplace noise requirements for live stage sound depend on the event space and worksite. Plan speaker output to suit the conditions that apply to the venue and event.

Can feedback damage hearing or speakers, and what should you do if it starts? Don’t leave a sustained feedback tone running. Lower or mute the affected microphone channel or speaker output, correct the placement causing the loop, then raise the level carefully.

2. Identifying and reducing feedback frequencies with EQ

Feedback has a tonal signature, but the sound alone doesn’t identify its cause. Singing tones often sit around 1 kHz, low howls around 250–500 Hz, and whistles or screeches above 2 kHz. Treat these as clues, not fixed rules: microphone, speaker and room placement affect which frequencies ring first.

To ring out a system, begin with the graphic EQ sliders flat and raise the microphone gain slowly. Stop as soon as a frequency begins to ring; don’t let feedback build into a sustained howl. Listen for the pitch or use a spectrum analyser, then make a narrow, modest cut. A cut of about 3 dB is a useful starting point. Recheck the result and repeat only if another frequency rings.

On a console with parametric EQ, sweep the frequency control slowly while listening for the ring to diminish. A broad starting search around 400 Hz can help locate a lower root frequency; an apparent 4,000 Hz peak may sometimes relate to a lower resonance, such as 630 Hz. Avoid cutting every suspected frequency, since excessive EQ can thin the microphone’s natural sound and reduce clarity.

Room modes can reinforce particular frequencies, especially when room dimensions align with bass wavelengths. For example, a 16-foot room dimension corresponds to a mode near 35.3125 Hz; a 16-foot-cubed room can build energy around 35 Hz and its octaves, 70 and 140 Hz. These resonances differ from the higher-pitched ringing often associated with feedback, so assess the room as well as the microphone pattern.

Keep gain before feedback in view: EQ should control the specific ring, not compensate for poor placement or excessive output. A focused cut, followed by a careful listening check, preserves more of the desired tone than broad reductions. For a live event, professional audio system planning can bring microphone, console and room response into one coordinated approach.

3. Avoiding monitor wedges for choir microphones

Choir microphones serve a different purpose from solo vocal microphones: they capture several voices together, often from farther away. Group microphones are frequently omnidirectional, picking up sound across the stage, including monitor wedges. In a church or concert hall, plan the choir’s monitoring needs separately from vocal pickup instead of automatically adding wedges beside the choir microphones.

Build the monitor mix around what each performer needs to hear. A choir may need a reference vocal, accompaniment or conductor cues, while nearby musicians may need a more detailed mix. Keep choir microphone channels out of unnecessary monitor sends, and provide wedges for soloists or band members with different monitoring needs.

In-ear monitors are another option for performers who need a personal mix. They let singers hear their own parts and accompaniment without adding another wedge to the stage. Set the mix carefully during rehearsal, with the choir in its performance arrangement, so the balance reflects what singers need to follow the music.

If wedges remain in use, keep their output only as high as performers need. A well-balanced stage mix helps performers hear their cues without filling the stage with excess sound. If ringing begins, lower the relevant monitor send or microphone channel, then listen again before adjusting other parts of the mix.

Thinning a wedge mix also helps control low-mid sound spilling towards the audience. Remove monitor content performers don’t need while preserving essential cues and musical references. This gives the front-of-house mix a cleaner stage sound and makes the choir easier to balance. For choir microphones, the priority is a focused monitor mix, not simply a louder one.

4. Choosing microphones for the singer and stage volume

Choose a microphone to suit the singer’s technique, stage volume and position relative to the PA. Cardioid and hypercardioid microphones are common directional choices for live vocals. A cardioid model with high gain before feedback can suit a singer whose microphone technique is inconsistent. On a loud stage, or when a singer performs in front of the PA, a tighter hypercardioid pickup pattern can help reject sound from the sides.

A moving-coil, or dynamic, microphone is a practical live-sound choice when feedback control matters. Its heavier diaphragm assembly has more inertia to overcome than a condenser microphone’s. This is one reason dynamic microphones are recommended for increasing gain before feedback. The right choice still depends on the singer’s voice, handling and position, not microphone type alone.

Check the microphone’s polar pattern before positioning monitors. A cardioid microphone rejects sound at the rear, while a hypercardioid microphone has some rear pickup and rejects sound at the sides. A singer using a hypercardioid mic should avoid pointing its rear pickup towards a loud monitor. Omnidirectional microphones pick up sound from all angles, so they’re generally unsuitable for high-volume vocal stages.

Microphone distance matters, too. Ask the singer to keep the capsule close to their mouth and maintain a consistent position through quiet and loud passages. Directional microphones used very close can produce 10–15 dB more low-frequency output, so the engineer should listen for excess bass while setting the signal. Close, consistent technique helps the vocalist stay clear without turning up the system unnecessarily.

During soundcheck, test the singer’s actual performance position and monitor level. Raise the vocal signal slowly while the musician sings at performance volume, listening for ringing as the PA and monitors operate together. Adjust microphone angle, monitor position or channel EQ before increasing level further. For a coordinated vocal setup, plan professional audio system support around the singer, stage layout and audience mix.

NextGen AV

NextGen AV helps event teams coordinate microphone, monitor and PA choices as part of a stage plan. When feedback risks involve several parts of the production, its Professional Audio Systems support can align sound reinforcement with the room, performers and audience experience. LED Video Walls, Lighting Design and Equipment, and Staging and Rigging can also be planned as part of the wider event environment.

For a Melbourne conference, gala or live performance, this coordinated approach helps manage technical decisions behind the scenes, from stage layout to clear, controlled sound. Share your event brief and performance requirements so the production can be shaped around the space and programme.

Contact NextGen AV to discuss your event’s audio and stage requirements.

Plan for a Clean Soundcheck

A strong event mix is designed around the performance, not just the equipment list. Schedule a soundcheck so singers, musicians and the audio team can work through the actual programme in their stage positions. This gives the engineer a practical reference for changes in performer movement, monitor preferences or room response before the audience arrives. Keep agreed microphone and monitor settings clear as the running order moves from rehearsal to the live event.

Use that preparation to turn soundcheck into a working part of your production plan. A focused discussion about how to prevent microphone feedback on stage can help align the sound team around the performers, the room and the event’s goals. For events where the audio setup needs careful coordination, NextGen AV can support the wider production with Professional Audio Systems and technical direction. Contact NextGen AV for sound support and take the next step towards a clear, confident performance.

Frequently Asked Questions

What Causes Feedback in a Sound System?

A stable pitch that grows as a vocal or monitor level rises points to feedback; handling noise is usually brief and irregular. To isolate the source during soundcheck, ask the performer to pause, then mute microphone channels one at a time. If the tone stops when a channel is muted, that channel is part of the loop. This test narrows the search before further adjustments.

What Is Acoustic Feedback?

Acoustic feedback is a sound-system loop carried through the air, not an unwanted signal caused by faulty wiring. For example, reflective surfaces can return amplified sound towards an open microphone and colour what it picks up. To help diagnose the issue, compare the sound with the microphone muted: a tone that disappears when the channel is muted is linked to its signal path.

What causes microphone feedback on stage?

Stage feedback can involve a vocal microphone, a monitor send, another open microphone or the main PA mix. To understand how to prevent microphone feedback on stage, isolate one variable at a time: pause the performer, mute a channel, then restore it and listen. This helps identify whether the trigger follows a particular microphone, performer position or monitor mix.

How should stage speakers be positioned to prevent microphone feedback?

Assess speaker coverage from the audience area as well as the stage. During soundcheck, have a technician listen across the room while the performer uses the microphone in position. A speaker aimed too broadly may send unnecessary sound towards microphones or reflective surfaces. Adjusting its direction or coverage can improve audience consistency while reducing unwanted sound reaching the stage.

How do you set microphone gain and sound levels to avoid feedback?

Set levels using the performer’s actual delivery, including quieter phrases and louder passages. Keep microphone channel, monitor send and main mix adjustments distinct, so a change for one performer doesn’t unexpectedly raise another part of the system. If the singer moves away from the microphone, address that change in technique before increasing the overall mix to compensate.

How can a sound engineer use EQ to reduce microphone feedback?

Use EQ as a targeted adjustment, not a substitute for diagnosing the signal path. A low-cut filter on a microphone channel can reduce unwanted low-frequency energy when it isn’t needed for the source. After a focused cut, compare the vocal with EQ engaged and bypassed at a similar listening level. This helps confirm that the adjustment addresses the problem without sacrificing useful tone.

Back to Articles

Discover Valuable Insights

Unlock Expert Tips and Advice

Our blog is packed with valuable information to help you stay ahead. Whether you’re looking for expert advice, industry trends, or practical tips, you’ll find everything you need. Reach out today to learn more or get in touch with us for personalised support!

Contact Us

Request A Quote

Make an
Enquiry

Let’s Get Your Event Sorted

Complete the enquiry form with your event date, venue, audience size, event type and budget. Our Melbourne AV team will review your requirements and recommend the right PA, screen, lighting, staging or production setup for your event.

What happens next?


1.We review your event details
Tell us your date, venue, audience size and event type.

2.We recommend the right setup
From PA hire to screens, lighting, staging and full AV production.

3. We come back with clear advice
You’ll receive practical recommendations and a fast quote from our Melbourne team.

Need help urgently?
Call 1300 792 922.

Resource Download

Tell us a bit about yourself to download our resources.

7